Adjustable Details and Construction Trends in Menswear
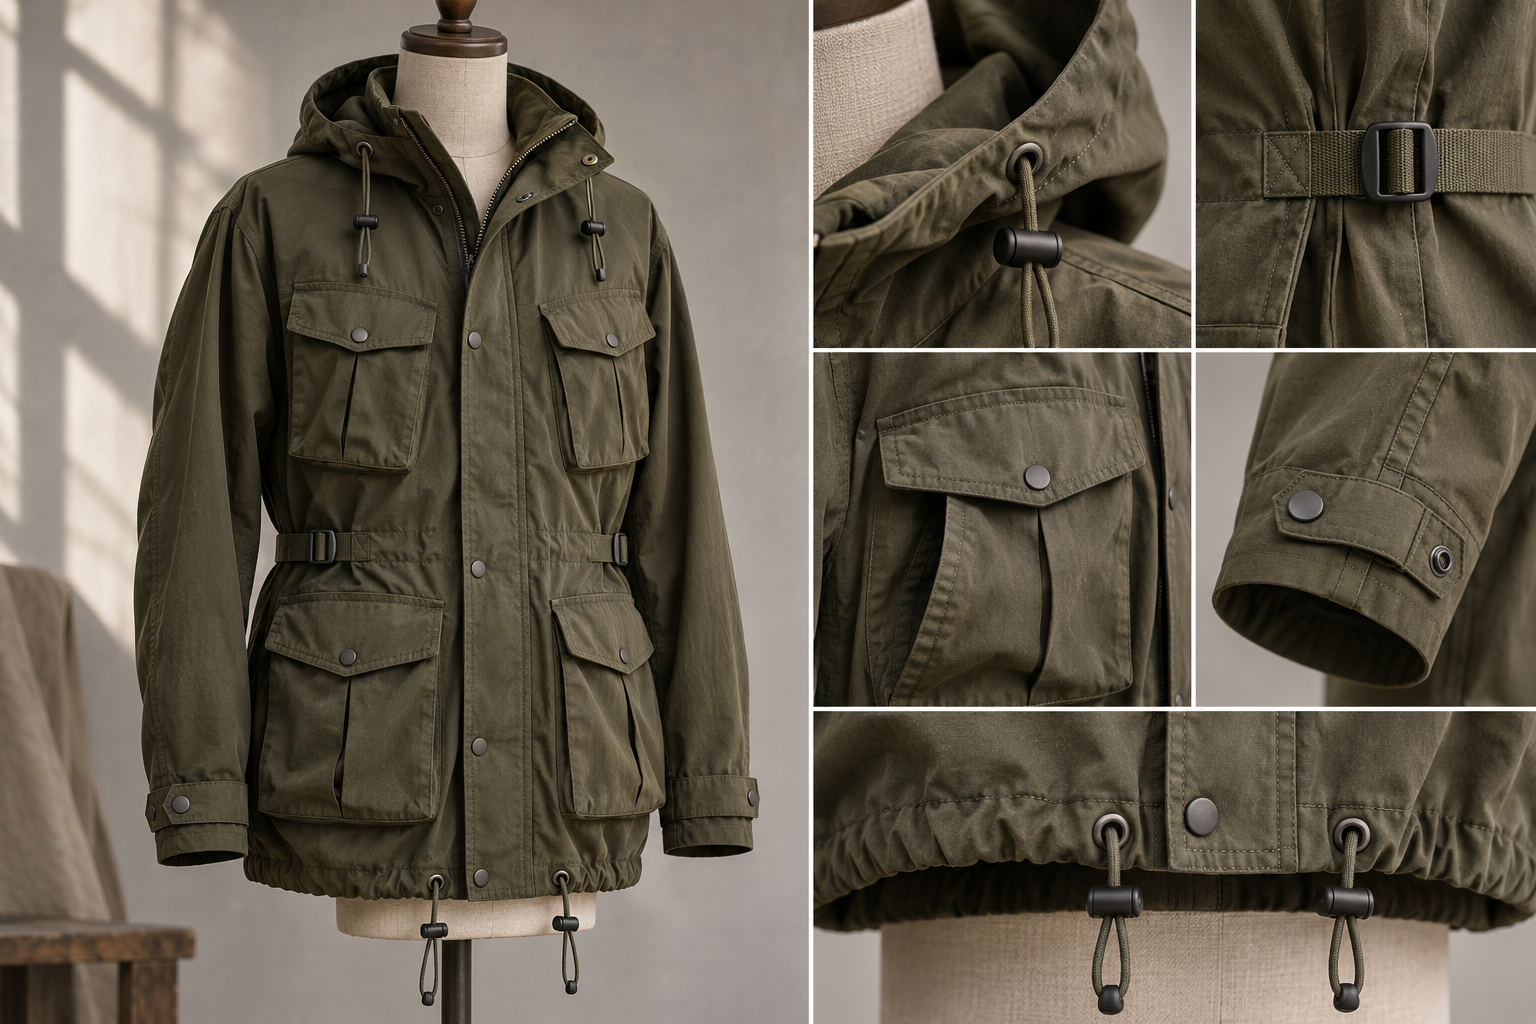
Focus on drawcords, buckles, waist adjustment and cuffs, connecting functional details to actual wearing actions.
An Adjustable Detail Should Start with a Real Problem
Drawcords, webbing, snaps and zippers can alter menswear silhouettes or improve fit adaptability, but more components do not necessarily mean more utility. Start with a specific need—‘more waist flexibility when seated’, ‘a jacket hem that cinches’ or ‘accessible storage with a backpack’—then choose the structure for a focused review.
This article discusses adjustable details as design and manufacturing options, not as market-validated trends. Adoption should reflect customer habits, price positioning, care and supply conditions. Moving an adjustment system from light outdoor trousers to business trousers may require entirely different appearance and touch treatments.
Waist Fit: What Elastic, Drawcords and Side Adjusters Solve
Elastic eases dressing, but different gathering at rest and in wear can change the waist's appearance. Drawcords allow further tightening but require an effective range, manageable ends and knot space. Side buckles concentrate adjustment at the sides and preserve a cleaner front waist, but hardware position and reverse-side contact need separate checks.
Compare three sample waistbands before making complete trousers. Attach different waist solutions to the same basic trouser pattern, observe standing, sitting and bending, then select against actual goals:
- Primarily easier dressing: first assess opening, recovery and basic waist room.
- Substantial adjustment: check gathering distribution and pocket changes after tightening.
- Minor adaptation only: limit excess webbing and buckle bulk so operation does not exceed the need.
Exposed structures also affect styling. Hardware visibility changes with fully tucked, half-tucked and untucked tops. Retain at least two styling options in selection photographs so purchasing sees actual outfit performance, rather than approving only a detail image exposing every component.
Hem Adjustment: Accommodate Excess Material Before Changing Shape
Cinching a jacket hem creates new gathers and may move side seams and pockets. The drawcord channel, exits and locks determine gathering distribution. Observe natural drape first, then tighten gradually, recording when front lift, distorted pocket openings or side-seam twisting begins.
Give excess cord ends a defined destination. Compare concealed channels, local anchors and simpler exposed arrangements during dressing, sitting, leaning and backpack use. Hardware, knots and seam bulk inside still matter even if invisible in front photographs.
If the garment is tightened only once for photography and rarely adjusted by users, reconsider whether an adjustment mechanism is needed. Pattern shaping may be more direct. Adjustment has continuing value when coverage or volume genuinely needs to change during use.
Buckles and Webbing: Choose Materials from the Intended Operation
Put buckle weight, edge feel, closure method and supply information on one sheet. Compare webbing width, thickness, stiffness and surface together. Even apparently matching components need actual threading and adjustment trials, especially for slipping, jamming or edge abrasion.
Having wearers locate and operate hardware without looking reveals issues missed by static reviews. One-handed use, seated adjustment and operation under outerwear may differ. If the mechanism needs repeated explanation, simplify it or provide a more identifiable gripping point.
Appearance alone cannot rank metal, plastic or other materials. Consider use conditions, care and supporting documentation. Where tensile strength, durability or other performance is specified, agree test methods and acceptance criteria with the supplier, then link results to the actual model and material adopted.
Pockets, Plackets and Adjusters Interact
A waist drawcord near a slanted pocket may change its opening direction when tightened; chest webbing may obstruct zippers or backpack straps. Load actual items, then retrieve, adjust and operate closures in sequence, noting where the other hand is needed or clothing must first be rearranged.
Layered plackets create visual depth, but grouped snaps, buttonholes and zippers add thickness. Distinguish everyday closures from backup fastenings so dressing does not require excessive operations. Urban everyday wearers may value seated comfort and a neat appearance more than additional visible fittings.
Partial samples reveal reinforcement and thickness but cannot replace whole-garment assessment. Stress-point placement relates to garment direction; a strong panel may still pull or pucker in the garment. Retain front, side and back review photographs and mark areas displaced during operation.
Bring Manufacturing and Care Conditions into Design Decisions
Adjusters often concentrate fabric layers, webbing and reinforcement stitching, creating thickness that affects manufacturing. Have process staff review samples early for equipment access, reverse-side neatness and repeatability. Improve diagrams for components with unclear installation directions so operators do not each rely on their own interpretation.
Care requirements also affect material combinations. Users should be able to understand how to remove accessories that require removal and carry out the operation; do not assume everyone recognizes concealed hardware. If accessories do not need to be removed, review appearance and function under the garment's planned care conditions. Retain approved physical items before bulk purchasing and recheck changes in model, color or source to reduce assumptions that similar appearance permits direct substitution.
Group Reviews by Problem, Rather Than Count Components
Group options by fit adaptation, silhouette and storage, giving each structure a clear task. The garment should already have a reasonable basic fit before adjustment; adjustable functions add flexibility rather than conceal sizing or pattern problems.
If webbing slips, check its compatibility with the buckle; if the waistband pinches, review adjuster location and gathering; if sitting creates pressure, check hardware placement and inner thickness. Recording the conditions of an issue drives revision more effectively than ‘use a more premium buckle’.
Keep photographs before adjustment, during wear and afterward to show the range. Displaying only the most attractive cinched position overlooks other states customers may actually use.
Final handover should retain trim models, installation directions, anchoring and edge-finishing methods, and sample approval status. Replacing buckles or webbing does not automatically retain earlier operating results. This lets a collection build identity with a few consistent details while giving every adjuster an explainable function.